Integrating Google Analytics with Marketo
- Subscribe to RSS Feed
- Mark as New
- Mark as Read
- Bookmark
- Subscribe
- Printer Friendly Page
- Report Inappropriate Content
- Mark as New
- Bookmark
- Subscribe
- Mute
- Subscribe to RSS Feed
- Permalink
- Report Inappropriate Content

Missed the first part of this series? See “Get on the Right “Track” with UTM Tagging.”
What is Google Analytics and Why Should I Use It?
Simply put, Google Analytics is an platform from Google which measures web activity in a holistic manner—meaning it can fill in some gaps Marketo leaves, such as paths taken to get to a web page, e-commerce conversions, audience data and more. Where it really finds power, though, is in using custom definitions to measure success with goals, paths, events and other metrics. Goals allow you to track conversions (and micro-conversions), paths allow you to trace a user’s overall journey between webpages on your site, and events function similarly to Marketo’s Interesting Moments with advanced categorization.
When you combine Marketo and Google Analytics, good stuff happens.
I thought Google Analytics had an integration with Marketo!
Yes and no. The integration you’re likely thinking of integrates the Marketo RTP product with Google Analytics; this will bring in dimensions and metrics specifically related to Real-Time Personalization (campaigns, segments, etc.) into Google Analytics. Note that what we’re covering today both does not require the Real-Time Personalization add-on and acts as a complementary method to what RTP’s Google Analytics integration achieves.
Setting up Google Analytics for Marketo
Marketo Landing Pages use a subdomain to host landing pages with your branding (i.e., info.demandlab.com vs. demandlab.com.) Because of this, you’ll need to make a decision on if and how you would like to split out Marketo landing pages from your main website. Because each Marketo customer is going to have a different answer to this question, we recommend you look at each of the situations listed over at Moz to decide your view setup.
Once you’ve determined your views, there are a few Marketo-specific items to take care of:
Exclude Marketo tracking tokens from your data: Leaving the mkt_tok value in your Analytics instance is the fastest way to turn your metrics into a big mess. Visit Admin -> View -> View Settings and look for “Exclude URL Query Parameters (optional).” Add mkt_tok to the box and save.
Activate User ID tracking: You can tie your Analytics session to your anonymous or known Marketo record by inserting the Marketo User ID as a Google Analytics User ID. Go to Admin -> Property -> Tracking Info -> User ID and follow the prompts to set up User IDs. We’ll use a custom tracking code later on to tie this to your Marketo record based on an anonymous/known user’s ID.
Note: though it’s tempting to use something like email address or name instead to label your session, this actually violates Google Analytics’ Usage Guidelines. Instead, you should use a third-party tool such as PII Viewer for Google Analytics to tie your Marketo user ID back to information you can read, such as email address, company or other demographics.
Add the Marketo User ID dimension: For clarity’s sake, I like to add an extra custom dimension explicitly labeled “Marketo ID” in order to explain what the random number assigned to a User ID is. This also makes for nicer reporting and dashboards. Head to Admin -> Property -> Custom Definitions -> Custom Dimensions and click +New Custom Dimension. Name the dimension Marketo ID and set the scope to User (meaning it will track across multiple visit sessions.)
(Spoilers: My Marketo ID for the session I had while working on this was 7498.)
Adding Google Analytics to your Marketo Templates
If you’re using the older free-form templates Marketo offers, you may have noticed the bottom of your template has a code block that starts with “GOOGLE ANALYTICS. ENTER YOUR CODE AND UNCOMMENT BLOCK.” While this was accurate in the days of classic Google Analytics, you’ll actually want to place new code that allows for extra Marketo data with Universal Analytics. Insert the following code before your closing body tag:
<script>// <![CDATA[ (function(i,s,o,g,r,a,m){i['GoogleAnalyticsObject']=r;i[r]=i[r]||function(){ (i[r].q=i[r].q||[]).push(arguments)},i[r].l=1*new Date();a=s.createElement(o), m=s.getElementsByTagName(o)[0];a.async=1;a.src=g;m.parentNode.insertBefore(a,m) })(window,document,'script','//www.google-analytics.com/analytics.js','ga'); ga('create', 'YOUR GOOGLE UA ID HERE', { 'userId': '{{lead.Id}}' }); ga('send', 'pageview'); ga('set', 'dimension1', '{{lead.Id}}'); // ]]></script>
This will set the user ID to correspond with your Marketo user ID, as mentioned earlier, and set the foundation for any advanced tracking you’d like to do (such as events or goals, which we’ll cover in our next post.) Re-approve all pages that use the template you’ve changed, and you’re good to go.
Note: If you would like to have your Lead ID be recognized on non-Marketo landing pages (such as your corporate website), you will need to do some extra API connections that depend on your specific webserver setup.
Thoughts Around Adding Google Analytics Data to Marketo
Once you’ve started tagging your URLs with UTM parameters, the next question most marketers have is how to work the data into their instance.
There are several different approaches to the topic of UTM data in Marketo: creating a custom object (either in Salesforce or calling Marketo to make a custom object) to monitor traffic, recording all parameter use in strings, and using first/last utm fields are all valid schools of thought (the latter in particular if you don’t have access to Revenue Cycle Analytics or Salesforce.) Moreover, some advanced set ups of Marketo that use multi-channel attribution to content can truly benefit from extensive UTM use.
However, I’ve personally come to the conclusion that there are only two real, solid UTM items that need to be tracked on Marketo’s side for most companies: Lead Source/Lead Source Detail and PPC traffic. This doesn’t mean you should abandon the rest of your UTM tags: the rest of the markup helps when comparing Marketo reports to Google Analytics reports.
With that said, you’ll need to make an internal decision with your sales and marketing teams on one of two directions to track UTM data: upon engagement or upon conversion. The difference is simple, but important: does a source get credit for bringing someone to a page, even if they don’t convert, or is conversion necessary for attribution? Although Google Analytics can calculate this with Multi-Channel Funnels, your company needs to be on the same page on what Lead Source means: first interaction or first conversion. You should also keep the approach consistent with what your company does for lead source and acquisition programs to keep everything on the same page.
Want to capture every last detail, and plan on not using engagement instead of conversion? Good news: We have a script that will parse all UTM parameters and record them as custom URLs in your Marketo instance. This is especially useful for items like capturing content variations or keywords used in PPC, as these are less predictably defined than your source, medium, or campaign.
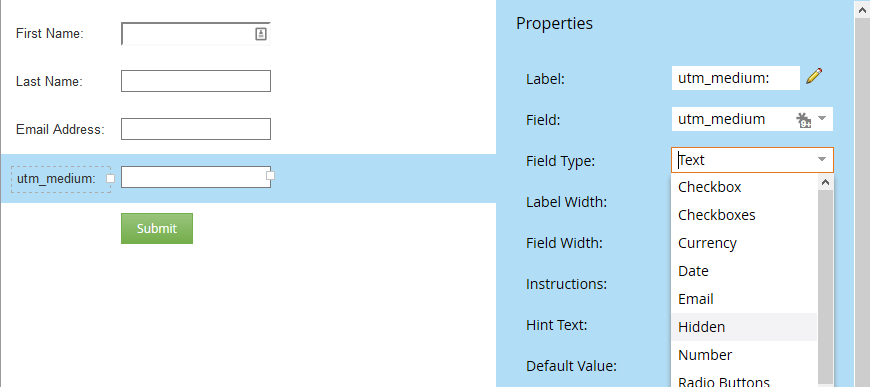
Want to capture data at the time of conversion with forms?Use Forms 2.0’s hidden field function to write data into your forms without having to do any extra programming. Simply add an extra field to capture this data:

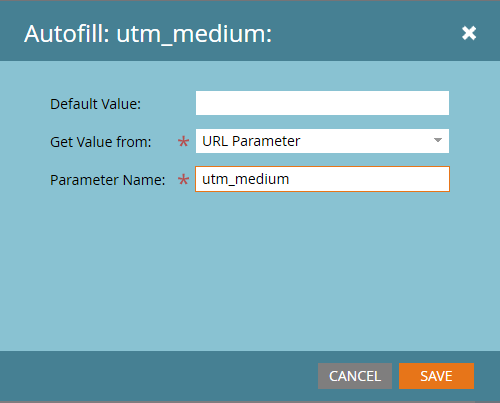
Then, set the field to read data from the corresponding parameter in your URL:

Want to reference querystrings in your Smart Campaigns? It’s easy! You can use querystrings as a constraint filter on the following:
- Triggers: Clicks Link on Web Page, Fills Out Form, Visits Web Page
- Filters: Clicked Link on Web Page, Filled Out Form, Visited Web Page
- Remember: Querystring constraints are not available for triggers/filters around email links and are not usable on any custom fields with the URL data type!
From there, the limit is only your imagination—create PPC programs that track your ROI and have credit in Revenue Cycle Explorer, have accurate Lead Sources and Lead Source Details, track A/B testing of promotional material, and more! Once you’ve mastered querystrings in your URLs with Google Analytics and Marketo, it’s time to take the next step: using Google Analytics to answer questions like:
- Why aren’t my forms converting?
- Who are my most effective blog authors? Who are my commenters?
- How can I track leads who share my items on social if I’m not using Marketo landing pages?
- How can I track events and goals in both Marketo and Google Analytics?
You should go read https://nation.marketo.com/; as a follow-up to this post for more information on these!
- « Previous
- Next »
You must be a registered user to add a comment. If you've already registered, sign in. Otherwise, register and sign in.
- Copyright © 2025 Adobe. All rights reserved.
- Privacy
- Community Guidelines
- Terms of use
- Do not sell my personal information
Adchoices