member.webinar url Explained
- Subscribe to RSS Feed
- Mark as New
- Mark as Read
- Bookmark
- Subscribe
- Printer Friendly Page
- Report Inappropriate Content
- Mark as New
- Bookmark
- Subscribe
- Mute
- Subscribe to RSS Feed
- Permalink
- Report Inappropriate Content
Running your first webinar in Marketo or having issues with the member.webinar url token not populating? Well then you’ve come to the right place! Get a run down of what the Marketo member.webinar url token is, how it gets populated, how to test it, and the most common reason why it might not be populating.
N.B. If you are looking for a general introduction to Marketo tokens and how they can save you time when building your emails, webhooks, and smart campaigns then check out the Great Use Cases for Marketo Tokens post.
What is the member.webinar url in Marketo?
The {{member.webinar url}} token is a program level token specifically for event programs in Marketo that are synced to a webinar partner like Zoom. It is automatically populated by the webinar partner whenever someone is moved to the “Registered” status in the Marketo program and can subsequently be used in emails to allow registrants to join using their own unique join link.
Since the member.webinar url is a program level field this means that every person in Marketo can simultaneously have different values for the member.webinar url field across the different webinar programs that they are a member of. This means that if you are running two webinars close together in time and someone registers for both webinars then they will have a different member.webinar url field in each webinar program and there is no need to worry about the member.webinar url field being overwritten, pointing to the wrong webinar, etc.
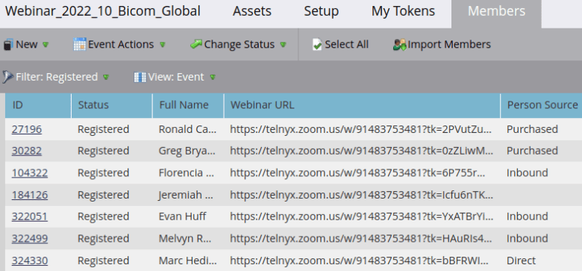
Registered members with the Webinar URL populated
If you want to see the member.webinar url values that registered members of the program have then:
- Click on the program heading and navigate to the “Members” tab
- Filter on the “Registered” status
- Click on the “View” drop down arrow and “Edit [View Name]”
- Search for “Webinar URL” in the “Hidden Columns” section
- Select the “Webinar URL” field and then click “Add”
- Click “Save”
- The “Webinar URL” column is automatically added as the furthest column to the right but you can change its position by dragging the column
How to use the member.webinar url token in an email
Using the {{member.webinar url}} token in a Marketo email is as simple as:
- Highlighting the text e.g. “Join Webinar”, that you want to hyperlink
- Clicking the “Insert/Edit Link” icon (look for the chain icon)
- Then paste {{member.webinar url}} into the “URL” field
- Optionally you can
- Fill out the “Title” field to change the text that appears when you mouse over the hyperlink
- Change the “Target” field to open in “Current Window” from “New Window”
- Disable “Tracking”
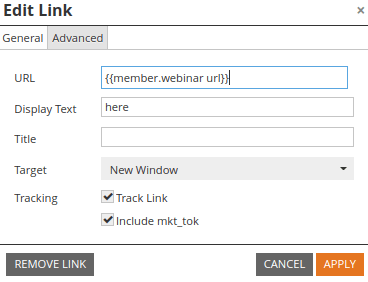
Using the {{member.webinar url}} token to hyperlink text
Alternatively, if you are using a button to prompt people to join the webinar then you can also use the {{member.webinar url}} token as the button link to allow people to access the webinar with their own unique join link.
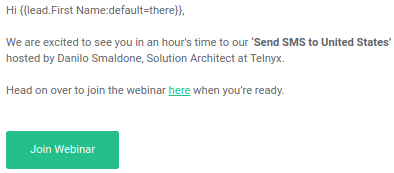
Using the {{member.webinar url}} token in CTAs
If you want to include calendar links containing a person’s unique join link in your registration confirmation emails then take a look at the Zoom Integration: Calendar Links with Unique Join URLs post to see how to set this up.
N.B. One thing you might want to consider is whether you want to make this email operational i.e. whether this email should be sent regardless of someone’s subscription status. In my opinion, there is a legitimate interest clause here since they registered for the webinar and this email contains the necessary information for them to join this webinar. In order for this legitimate interest clause to hold this email should solely be focused on joining the webinar and not contain any other marketing content e.g. special offers, contact sales etc.
Testing the member.webinar url token is populating correctly
Since the Marketo program is synced to the webinar partner, whenever someone is marked as registered in the Marketo program this person gets sent over to the webinar platform and the webinar platform sends the unique value for the {{member.webinar url}} token back. There are 2 ways you can mark yourself as registered so that you can test the {{member.webinar url}} token is working correctly.
The first way to mark yourself as registered in the Marketo webinar program is to:
- Navigate to the Database section
- Type your email in the “Quick Find” search bar that appears
- Click the record that appears for this email
- Click the “Person Actions” dropdown
- Select Programs > Change Program Status
- Enter the name of the webinar program
- Select “Webinar > Registered” for “New Status”
- Click “Run Now”
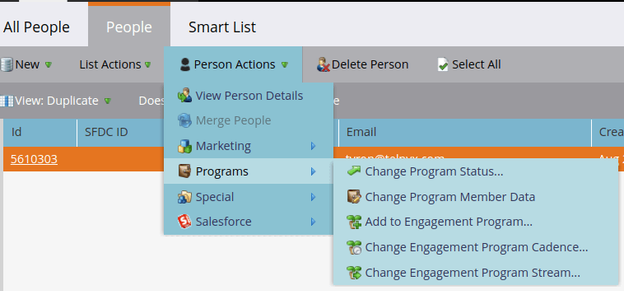
Registering for the webinar program from the Marketo database
Alternatively, you can create a new smart campaign to change your status in the Marketo webinar program by:
- Right clicking on the Marketo webinar program
- Selecting “New Smart Campaign”
- Entering a name for the smart campaign
- Navigating to the “Smart List” tab of the smart campaign
- Dragging in the “Email Address” filter and entering your email
- Navigating to the “Flow” tab
- Dragging in the “Change Program Status” action
- Selecting “Webinar > Registered” for “New Status”
- Navigating to the “Schedule” tab
- Clicking “Run Once” and then “Run Now”

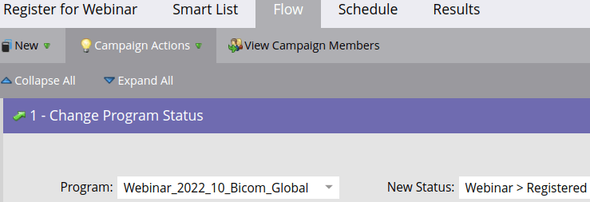
Smart campaign used to set status as registered
Once you have marked yourself as registered you can then navigate to the “Members” tab of the program, search for your email address, and then you should see the “Webinar URL” column populated. Now to make sure this {{member.webinar url}} token is working correctly follow the steps below to send yourself an email where you can test the token.
Sending an email to test the member.webinar url token
Next we will set up a smart campaign to send a test email to ourselves using a smart campaign. I always recommend using a smart campaign to send a test email instead of the “Send sample” option available by right clicking on the email. I’ve had issues in the past where this “Send sample” option did not send the content as the final customer actually received it (there were issues with links within dynamic content 404ing). Using a smart campaign to send the email will always ensure that you see the exact same email that your customers will see.
- Follow steps 1 through 6 above to create a new smart campaign
- Drag in the “Send Email” action
- Select the email which contains the {{member.webinar url}} token
- Navigate to the schedule tab
- Click “Run Once” and then “Run Now”

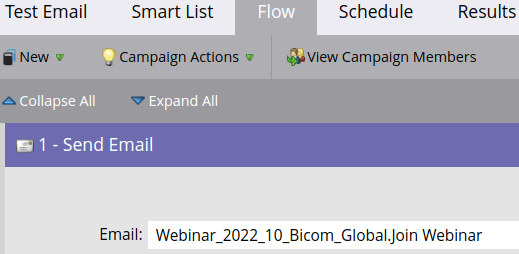
Smart campaign used to send a test email
N.B. If you decided not to make this webinar email operational then make sure you are subscribed to receive emails or else you won’t receive this test email.
Why is the member.webinar url token not populating?
This is most likely because you are using an email program to send the email. In this case the {{member.webinar url}} token can only see the membership information associated with the email program. In order to get the {{member.webinar url}} token to work correctly it is best to use smart campaigns nested within the webinar program to send webinar emails.

Correct setup for sending emails using the {{member.webinar url}} token
What’s Next for your Marketo Webinars?
Now that you understand the ins and outs of how to use and test the {{member.webinar url}} token you might be interested in sending calendar links that contain unique join URLs. If this tickles your fancy then take a look at the post below:
Also if you want to ensure that the webinar emails you send out from Marketo scale well across screen sizes and look great on any email client and device then you should check out the Email Template Quick Start guide.
You must be a registered user to add a comment. If you've already registered, sign in. Otherwise, register and sign in.
- Copyright © 2025 Adobe. All rights reserved.
- Privacy
- Community Guidelines
- Terms of use
- Do not sell my personal information
Adchoices