Your Achievements
Next /
Sign inSign in to Community to gain points, level up, and earn exciting badges like the new Applaud 5 BadgeLearn more!
View All BadgesSign in to view all badges
SOLVED
Re: How do you add a form border and custom button in a marketo form?
Go to solution
Topic Options
- Subscribe to RSS Feed
- Mark Topic as New
- Mark Topic as Read
- Float this Topic for Current User
- Bookmark
- Subscribe
- Printer Friendly Page
- Mark as New
- Bookmark
- Subscribe
- Mute
- Subscribe to RSS Feed
- Permalink
- Report Inappropriate Content
03-24-2017
07:20 AM
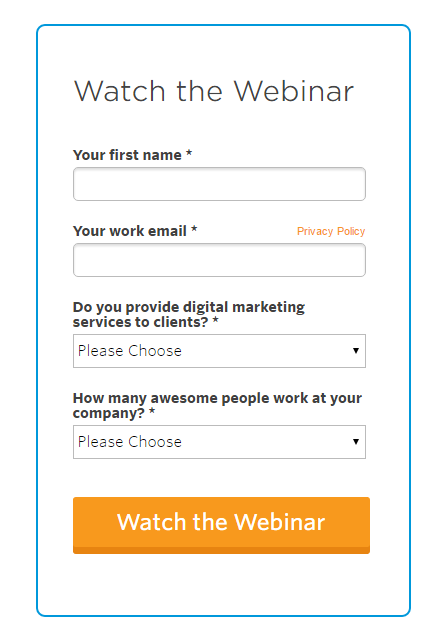
Hi all,
See attached image for what I am trying to accomplish.
Question:
How do you add a form border and custom button/edits in a marketo form? I can't figure out the proper CSS. (Not a programmer)
Thanks!
Solved! Go to Solution.
1 ACCEPTED SOLUTION
- Mark as New
- Bookmark
- Subscribe
- Mute
- Subscribe to RSS Feed
- Permalink
- Report Inappropriate Content
03-24-2017
02:00 PM
Two things I can see -- the CSS you're using to select the button isn't working because the .mktoButton element isn't contained within a .mktoSimple class -- the correct targeting to use would be:
.mktoForm .mktoButtonWrap.mktoDownloadButton .mktoButton {
Also, there's a number of styles from your page/template's <head> that are setting values for background (among other things). So I may have led you a bit astray earlier -- try switching background-color back to background, and see if the yellow color is applied.
17 REPLIES 17
Anonymous
Not applicable
06-30-2017
08:56 AM
- Mark as New
- Bookmark
- Subscribe
- Mute
- Subscribe to RSS Feed
- Permalink
- Report Inappropriate Content
06-30-2017
08:56 AM
Hey all:
I am having a very similar problem and the Marketo support seems to be getting annoyed with me. All i want is to remove the additional green that happens when you click over the submit button and increase the Submit button text. I have tried it all and nothing seems to be helping. ADDITIONALLY- if there is a way to change the font color of the "select" for state and such that would be wonderful. I have more questions but I will start there and see what happens:) Thank you all so much in advance. This is such a headache:(
- Mark as New
- Bookmark
- Subscribe
- Mute
- Subscribe to RSS Feed
- Permalink
- Report Inappropriate Content
06-30-2017
09:04 AM
Please open a new thread for these new questions (probably two new questions).
A thread can only be closed by its original opener, and only one answer can be marked Correct, so this is better for clarity and later searches.
Anonymous
Not applicable
06-30-2017
09:08 AM
- Mark as New
- Bookmark
- Subscribe
- Mute
- Subscribe to RSS Feed
- Permalink
- Report Inappropriate Content
06-30-2017
09:08 AM
Can do- thank you. I think I figured it out
- Mark as New
- Bookmark
- Subscribe
- Mute
- Subscribe to RSS Feed
- Permalink
- Report Inappropriate Content
03-24-2017
07:48 AM
Hi Nate,
You have options in terms of where exactly to put custom CSS to target forms -- you can do it at the form level (so that all pages with this form have the border/button), or at the template level (so that any form on a landing page created with that template has those styles) or on a single landing page as a one-off.
In terms of exactly how you'd do it, you can target the entire form with the .mktoForm class and add a border property, and the button with .mktoButton.
- Mark as New
- Bookmark
- Subscribe
- Mute
- Subscribe to RSS Feed
- Permalink
- Report Inappropriate Content
03-24-2017
11:01 AM
Here is my custom CSS. The border is working great. The button however still is left aligned and the css is not changing it. I used this as a resource: How To Style A Marketo Form Like A Pro
/* Add your custom CSS below */
.mktoForm {
border-style: solid !important;
border-width: 2px !important;
border-color: #c4d82d !important;
border-radius: 9px !important;
}
.mktoForm .mktoRequiredField label.mktoLabel {
padding-bottom: 10px !important;
}
.mktoForm input[type=text], .mktoForm input[type=url], .mktoForm input[type=email], .mktoForm input[type=tel], .mktoForm input[type=number], .mktoForm input[type=date], .mktoForm textarea.mktoField, .mktoForm select.mktoField {
width:357px !important;
top: 19px !important;
left: 0px !important;
width: 350px !important;
font-size: 20px !important;
line-height: 25px !important;
height: 42px !important;
padding-left: 8px !important;
padding-right: 8px !important;
}
.mktoFormCol, .mktoFieldWrap {
width: 357px !important;
}
.mktoButtonWrap {
margin-left:0 !important;
}
.mktoButtonRow {
width:320px !important;
text-align:center;
}
.mktoForm .mktoButtonWrap.mktoSimple .mktoButton {
width:320px !important;
background:#f8991d !important;
padding:10px 20px !important;
font-size: 28px !important;
}
- Mark as New
- Bookmark
- Subscribe
- Mute
- Subscribe to RSS Feed
- Permalink
- Report Inappropriate Content
03-24-2017
11:47 AM
If I had to guess, I'd say it's probably the margin on the .mktoButtonWrap element you had here:
.mktoButtonWrap {
margin-left:0 !important;
}
That's telling the button container to start all the way to the left of the form it's in. Add a positive value there (or try setting it to auto), and you should see it move closer to the center. Do you have a link to the form on a live page we could inspect? Note that if/when you drag the position of the button in the form editor, that also applies some CSS that you may see pop up if any of your !important disclaimers get removed.
- Mark as New
- Bookmark
- Subscribe
- Mute
- Subscribe to RSS Feed
- Permalink
- Report Inappropriate Content
03-24-2017
12:09 PM
I got the button to center. I was missing an "!important;" Do you know why my button styling wouldn't be changing to what I specified in my custom CSS? It still is the same default button for some reason.
- Mark as New
- Bookmark
- Subscribe
- Mute
- Subscribe to RSS Feed
- Permalink
- Report Inappropriate Content
03-24-2017
12:44 PM
In this bit of CSS:
.mktoForm .mktoButtonWrap.mktoSimple .mktoButton {
width:320px !important;
background:#f8991d !important;
padding:10px 20px !important;
font-size: 28px !important;
}
You'd want to change background to background-color.
- Mark as New
- Bookmark
- Subscribe
- Mute
- Subscribe to RSS Feed
- Permalink
- Report Inappropriate Content
03-24-2017
12:53 PM
Hi Michael,
Thanks for working with me on this. I still can't get anything to happen with the button. It stays the same as the default look. Changing background to background-color as well doesn't change anything. Not sure where to go from here.
- Mark as New
- Bookmark
- Subscribe
- Mute
- Subscribe to RSS Feed
- Permalink
- Report Inappropriate Content
03-24-2017
01:07 PM
Have you posted your URL in this thread? I don't see it. This is a necessary ingredient if we're troubleshooting CSS.
- Mark as New
- Bookmark
- Subscribe
- Mute
- Subscribe to RSS Feed
- Permalink
- Report Inappropriate Content
03-24-2017
01:08 PM
Hi Sanford,
I just posted it above.
Thanks
- Mark as New
- Bookmark
- Subscribe
- Mute
- Subscribe to RSS Feed
- Permalink
- Report Inappropriate Content
03-24-2017
01:03 PM
Can you share a link to your page? It's always helpful to troubleshoot in a live environment...
- Mark as New
- Bookmark
- Subscribe
- Mute
- Subscribe to RSS Feed
- Permalink
- Report Inappropriate Content
03-24-2017
01:07 PM
Here is the page: pages.hexarmor.com/Webinar-Test_Test5.html
Below is the current form's custom CSS:
/* Add your custom CSS below */
.mktoForm {
border-style: solid !important;
border-width: 2px !important;
border-color: #c4d82d !important;
border-radius: 9px !important;
}
.mktoForm .mktoRequiredField label.mktoLabel {
padding-bottom: 10px !important;
}
.mktoForm input[type=text], .mktoForm input[type=url], .mktoForm input[type=email], .mktoForm input[type=tel], .mktoForm input[type=number], .mktoForm input[type=date], .mktoForm textarea.mktoField, .mktoForm select.mktoField {
width:300px !important;
top: 19px !important;
left: 0px !important;
font-size: 20px !important;
line-height: 25px !important;
height: 42px !important;
padding-left: 8px !important;
padding-right: 8px !important;
}
.mktoFormCol, .mktoFieldWrap {
width: 300px !important;
}
.mktoButtonWrap {
margin-left:0 !important;
}
.mktoButtonRow {
width:280px !important;
text-align:center !important;
}
.mktoForm .mktoButtonWrap.mktoSimple .mktoButton {
width:320px !important;
background-color:#f8991d !important;
padding:10px 20px !important;
font-size: 28px !important;
}
- Mark as New
- Bookmark
- Subscribe
- Mute
- Subscribe to RSS Feed
- Permalink
- Report Inappropriate Content
03-24-2017
02:00 PM
Two things I can see -- the CSS you're using to select the button isn't working because the .mktoButton element isn't contained within a .mktoSimple class -- the correct targeting to use would be:
.mktoForm .mktoButtonWrap.mktoDownloadButton .mktoButton {
Also, there's a number of styles from your page/template's <head> that are setting values for background (among other things). So I may have led you a bit astray earlier -- try switching background-color back to background, and see if the yellow color is applied.
- Mark as New
- Bookmark
- Subscribe
- Mute
- Subscribe to RSS Feed
- Permalink
- Report Inappropriate Content
03-26-2017
11:09 AM
That worked! Thanks Michael! Do you know why I have two borders showing up? Can't figure out why...
- Mark as New
- Bookmark
- Subscribe
- Mute
- Subscribe to RSS Feed
- Permalink
- Report Inappropriate Content
03-27-2017
07:20 AM
Not sure -- I can't see the test page anymore, could be that you have another element on your page with the .mktoForm class? Have a look at extraneous border in the inspector to see why that style is showing.
- Mark as New
- Bookmark
- Subscribe
- Mute
- Subscribe to RSS Feed
- Permalink
- Report Inappropriate Content
03-24-2017
09:30 AM
Hi Michael,
I have tried adding custom CSS in the form that people say works but it doesn't. For example, I tried this: CSS to Change the Button on the Form . Could you provide a some CSS that I should use to change the border or button?
Thanks
- Copyright © 2025 Adobe. All rights reserved.
- Privacy
- Community Guidelines
- Terms of use
- Do not sell my personal information
 Adchoices