REST API Custom Connection Series with Marketo and Python
- Subscribe to RSS Feed
- Mark as New
- Mark as Read
- Bookmark
- Subscribe
- Printer Friendly Page
- Report Inappropriate Content
- Mark as New
- Bookmark
- Subscribe
- Mute
- Subscribe to RSS Feed
- Permalink
- Report Inappropriate Content
Hello Adobe Marketo Engage users,
I want to use this blog series to teach people how to write python to start solving some of your Marketo engage issues through the API. I will include resources for how to learn to use python, webinar resources, and code. This blog will be broken up into a series with the easiest scripts to write and run all the way through some more complexity. It is important to note that learning how this code works and being able to debug will help you build more complex use cases. Code must be changed and mapped based on your Marketo instance, so variables, fields, and values will change. The boiler plate code can be used to solve a variety of different issues, those will be included below.
This blog post will follow the API deep dive webinar that Darshil and I presented on. All the code below is great for getting started and how to think about writing different calls into Marketo via the rest API.
*** Different methods of connecting to the API ***
There are several code languages that can be used to solve for API related change management in Marketo, you can also use Postman, the only drawback with Postman is solving for looping, you can only do one change at a time, so it is not as efficient as Python. There are ways to solve for looping in Postman, but this is not the blog post to teach those methods.
Common coding languages and use cases for writing to the API in Marketo
Python – batch scripting, lambda architecture, cloud architecture
Java, C# – Framework, robust backend language support, cloud architecture
SQL – Database query language for handling large data sets
Resources for learning:
- 2016 post Instructions for REST API connection:
- Marketo REST Library for simplifying Python GET and POST calls:
- Getting Started with Market Engage APIs Webinar:
- W3 Schools Python tutorial:
- API deep dive webinar:
- Custom activity Python script
Let's get started~!
*** Pre-requisites download Python and Pycharm ***
1.Download Python [Easiest to learn]
https://www.python.org/downloads/
* Make sure to select auto pathing for running console Python. Otherwise Python will need to be added to your system level pathing which requires a system administrator on your local machine, see here for more details on this subject, https://realpython.com/add-python-to-path/
2.Download Pycharm [IDE coding environment] https://www.jetbrains.com/pycharm/download/?section=windows
*** Important to note***
Upfront issues we face when using code in this blog post. Spacing becomes an issue. Python uses spaces for formatting, so if that error occurs, you will need to correct the spacing.
Anyway, let’s first create the Marketo connection using Launchpoint.
Steps in Marketo developer documentation to create the launch point in your instance: https://developers.marketo.com/rest-api/
Once the API user is created, you should now have a custom launch point with authorization codes available for view.
+++ Warning, these codes need to be kept secret, do not pass these codes around and protect them at all cost+++
*** Authentication codes ***
These codes will be needed. Copy your instance munchkin id, your client id, and client secret.
*** Pre-requisite Download the dependency library ***
This is the best library out there, easy, and consistent to use: https://github.com/jepcastelein/marketo-rest-python
The same steps are available in the github library
- Install github library
- Type: pip install marketorestpython
- Or
- Go to Pycharm -> settings -> project: <Your project name here> -> Python Interpreter -> + or add, depends on OS -> search: marketorestpython
- Install
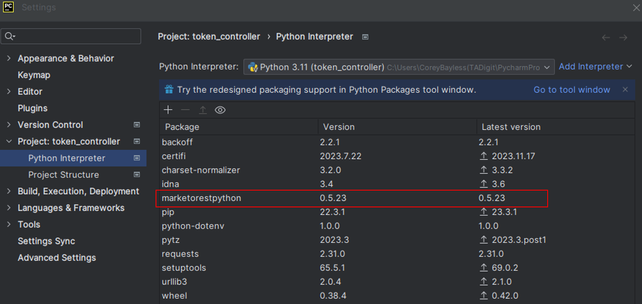
Pycharm view for having the library correctly installed.
*** Baseline code for connecting to Marketo ***
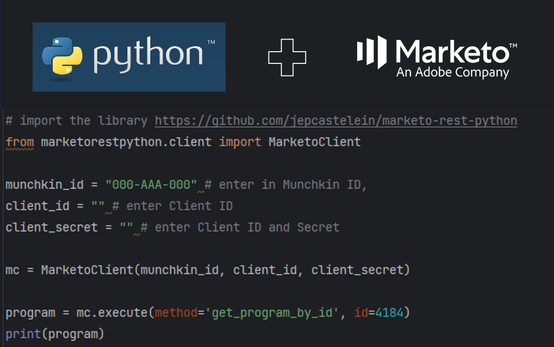
Add this code to Pycharm and the Python file created. main.py is an example, if you downloaded the library, then this will run if you have the right id.
Please note, all code samples are Python below
from marketorestpython.client import MarketoClient #Jeps github library

munchkin_id = "000-AAA-000" # Add munchkin id
client_id = "" # Add client id
client_secret = "" # Add client secret

mc = MarketoClient(munchkin_id, client_id, client_secret)

program = mc.execute(method='get_program_by_id', id=4184)

print(program)
your id is your program id in your instance of Marketo. This can be found in the URL of the resource:
https://engage-ab.marketo.com/?munchkinId=###-###-###classic/PG4184A1
4184 is the program id
This is the same for any Marketo resource. Once you have the ID, you can GET and POST anything needed.
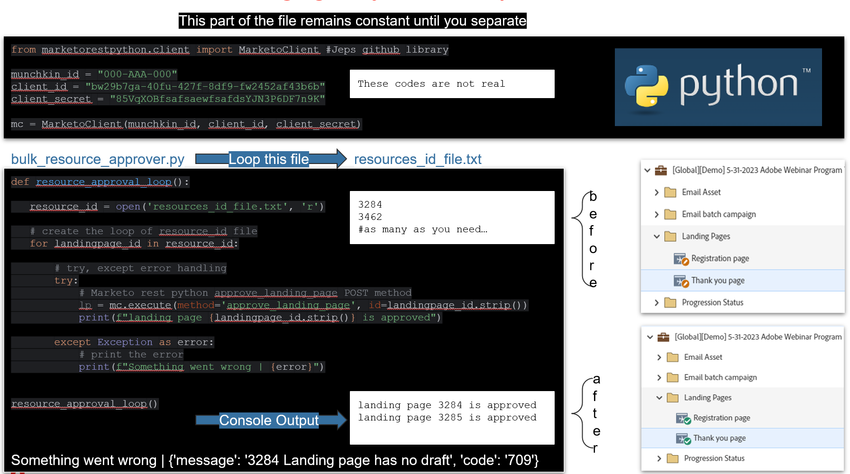
More advanced looping technique
from marketorestpython.client import MarketoClient #Jeps github library

munchkin_id = "000-AAA-000" # Add munchkin id
client_id = "" # Add client id
client_secret = "" # Add client secret

mc = MarketoClient(munchkin_id, client_id, client_secret)
def resource_approval_loop():

   resource_id = open('resource_id_file.txt', 'r')

   # create the loop of resource_id file
   for landingpage_id in resource_id:

       # try, except error handling
       try:
           # Marketo rest python approve_landing_page POST method
           lp = mc.execute(method='approve_landing_page', id=landingpage_id.strip())
           print(f"landing page {landingpage_id.strip()} is approved")

       except Exception as err:
           # print the error
           print(f"Something went wrong | {err}")


resource_approval_loop()
# Other calls that can use the structure above

# lp = mc.execute(method='delete_landing_page', id=411)
# lp = mc.execute(method='approve_landing_page', id=410)
# lp = mc.execute(method='discard_landing_page_draft', id=410)
# form = mc.execute(method='discard_form_draft', id=456)
# form = mc.execute(method='delete_form', id=50)
# email = mc.execute(method='delete_email', id=263)
# email = mc.execute(method='approve_email', id=117)
# email = mc.execute(method='discard_email_draft', id=117)
# campaign = mc.execute(method='activate_smart_campaign', id=1880)
# campaign = mc.execute(method='deactivate_smart_campaign', id=1880)
# campaign = mc.execute(method='update_smart_campaign', id=1880, name='New Name', description=None)

# campaign_id = campaign[0]['id'] # capture the substring of the object from the dictionary
That is it for right now, the next series will be attached to this blog post, I will keep everything together so resources are not lost in the future.
Happy marketing,
-Corey
You must be a registered user to add a comment. If you've already registered, sign in. Otherwise, register and sign in.
- Copyright © 2025 Adobe. All rights reserved.
- Privacy
- Community Guidelines
- Terms of use
- Do not sell my personal information
Adchoices


